Showing posts with label gluten-free. Show all posts

May 19, 2007

Mint Chocolate Cookies - Gluten Free

When I ordered our Girl Scout cookies, I bought some Do-Si-Dos and Thin Mints - both are family favorites. My husband's favorite cookies are the Do-Si-Dos, a lovely peanut butter sandwich cookie. I took on the challenge of making this cookie in a gluten free version in April. Now it's time to tackle my favorite Girl Scout cookie - the Thin Mint. I used to like to eat this cookie fresh from the box or frozen, either way they were delicious.

Inspired by Heidi at 101 Cookbooks and a recipe that I found at Epicurious.com, I set out to work up a gluten free version of the Thin Mint. After deciding on what ingredients I would use for my attempt, I headed off to Whole Foods to pick up the things I didn't have on hand. Then I began to work...

Recipe

Chocolate Wafer Cookie

1/2 cup brown rice flour
1/2 cup sweet rice flour
1/4 cup oat flour (Cream Hill Estates)
1/4 cup arrowroot flour
3/4 cup unsweetened cocoa powder
1/4 tsp sea salt
1 cup cane sugar
12 Tb butter
1 egg, beaten
1 1/2 tsp kuzu/kudzu powder, crushed
1 1/2 tsp peppermint extract or oil
1 tsp vanilla

Chocolate Topping

6 to 7 ounces dark chocolate or semisweet chocolate morsels
1/2 tsp peppermint extract or oil

1. Making the Cookie Dough: Cover a cookie sheet or another flat working surface with a sheet of parchment paper. Then in a medium mixing bowl, place the flours, cocoa, salt, sugar and blend. In small bowl or mortar and pestle crush the kudzu powder until fine crumbs. In another bowl beat the egg and add the kudzu powder, then blend together. In a large mixing bowl, place the butter and beat until creamy. Stir the egg and kudzu mixture, then add to the butter. Then add the peppermint extract, vanilla and blend. Slowly add the dry ingredients. Once the mixture makes a ball, remove the dough from the bowl and place on the parchment paper.

2. Rolling out the Dough: Slowly mold the dough into a ball. Then ease the dough across the parchment paper until it begins to make a log. Roll out until the dough is about two inches in diameter.

3. Chilling the Dough: Once the dough is rolled out, wrap it in the parchment paper. Place the wrapped dough in the refrigerator for at least two hours before slicing.


4. Slicing the Dough: Preheat the oven to 350 degrees F and line a cookie sheet with parchment paper. Then remove the dough from the refrigerator, unwrap it and place on a cutting surface. Using a sharp knife, cut 1/4 inch slices off the log and place on the parchment paper lined cookie sheet. Place the slices about one inch apart.

5. Cooking the Dough: Cook for 15 minutes or until the tops and edges appear dry. Allow them to cool before removing from the cookie sheet.

6. Making the Chocolate Topping: Place several cups of water in the bottom of a double boiler and bring to a simmer. Place the top of the double boiler on and place the chocolate in it. Stir the chocolate and once melted add the peppermint extract. Blend together. Turn off the heat.


7. Glazing the Cookies: You can glaze the cookies in chocolate or cover them in chocolate. To glaze the cookies: dip a fork or spatula into the chocolate and wave it back and forth across the cookies. To cover the cookies: place a cookie in the chocolate and then turn it over. Once it is covered, pick it up with tongs and allow some of the excess chocolate to drip off. Then place on the parchment paper to cool.


8. Cooling the Cookies: Allow the cookies to dry on the counter overnight. Once dry you can place some in the freezer for a frosty treat.


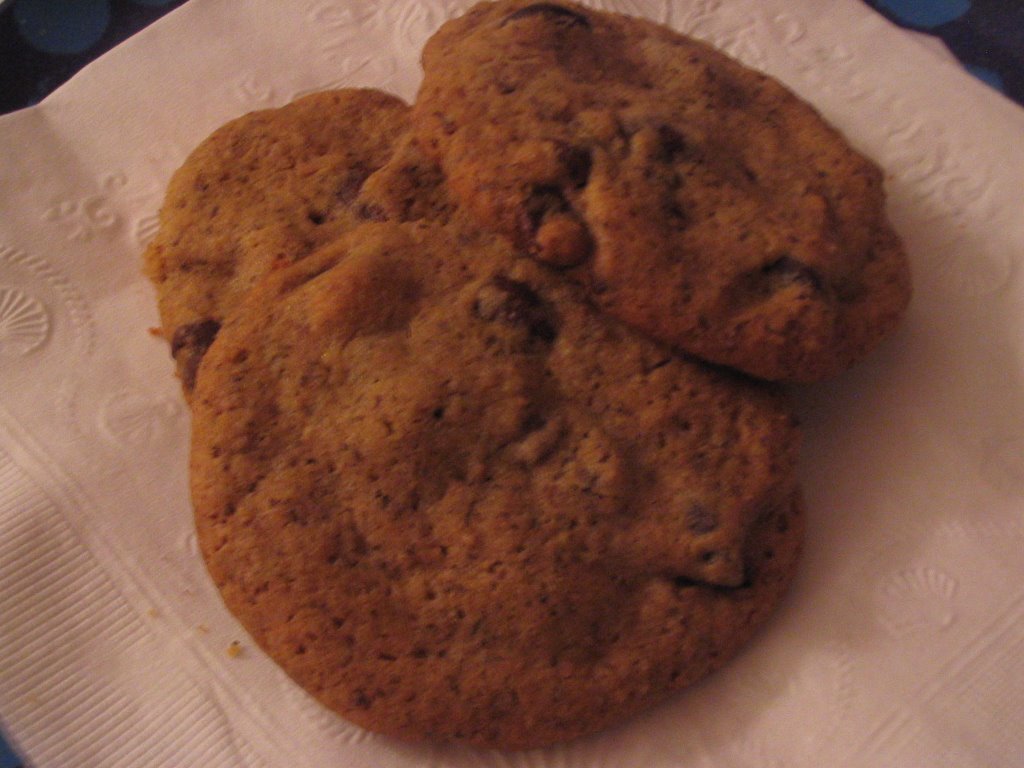
How did they turn out? Beautifully. When they are first made the cookies have a dark and intense chocolate flavor with a hint of peppermint. By the next day the cookies have mellowed and are milder in flavor. I froze one of the cookies that we dipped in chocolate and it reminded me of a frozen Thin Mint. My daughter thought the cookies were too intense. My son thought they didn't quite taste like a Thin Mint, but they were really good. My husband agreed with him and added that my cookies had a more intense chocolate flavor. He preferred the dipped cookies to those that were glazed with chocolate. We all agreed that the frozen cookies tasted the most like Thin Mints.

This one is a keeper.

May 5, 2007

Applewood Smoked Ham Scones with Maple Butter - Gluten Free

At our house Saturday mornings are our special family time. My husband and I started this tradition when we were first married. We would sleep in and then cook a traditional breakfast meal together. Then we would spend the rest of the morning talking, catching up and planning our weekend together. Once we had children, we continued our Saturday morning family time tradition and it is now their favorite part of the weekend. Since becoming gluten-free, our breakfasts haven't included any or our favorite classic breakfast breads, something my husband and I have really missed.

One of my favorite scone recipes was a Country Ham Scone recipe, originally published in a Southern Living Christmas Book. This recipe was made so many times, the page in the book looks wrinkly and worn. I wanted to add this scone back into our Saturday morning breakfast menus, so I began to work on modifying this recipe so that it was gluten free. The final version of this recipe is wonderfully buttery with sweet ham and pepper.

Scone Recipe

1/2 cup brown rice flour
1/2 cup oat flour
1/2 cup arrowroot
1/4 cup sweet rice flour
1/4 cup yellow cornmeal
2 tsp baking powder
1/2 tsp sea salt
2 Tb cane sugar
1/2 tsp black pepper
6 Tb cold butter, cut into small pieces
3/4 cup Niman Ranch Applewood Smoked Ham, finely chopped*
1 cup whipping cream
2 tsp kudzu (kuzu) powder, dissolved in the whipping cream

Preheat the oven to 425 degrees F and line an 8 x 8 inch pan with parchment paper. In a large mixing bowl place the first 9 ingredients and blend. Then add the butter pieces and cut the butter into the flour mixture. Work until the blend is crumbly. Add the ham and blend. Add the whipping cream and kudzu powder mixture and blend until the mixture is moistened. Using your hands kneed the mixture in the bowl until it is blended together. Place the dough into the pan and press it out. Next score the top of the dough with a knife into 8 wedges, taking care not to cut all the way through the dough.

Bake at 425 degrees F for 24 minutes or until golden brown. Allow it to cool before serving with Maple Butter.

Maple Butter Recipe

1/2 cup softened butter
2 Tb maple syrup
Optional: 2 Tb chopped peans

In a mixing bowl, cream the butter and then add the maple syrup. Blend. Serve with the Applewood Smoked Ham Scones.

How did they go over? My husband and I really enjoyed these scones. My daughter wasn't crazy about the flavor of the scone. My son thought they should have more ham than bread, but they didn't taste too bad.

6/11/07 Note: Niman Ranch Customer Service says that all their products are gluten-free with the exception of the St. Louis pre-cooked ribs.

March 27, 2007

Sweet Potatoes With Onions & Rosemary

The humble sweet potato is a staple food at my house. They have many wonderful culinary uses, such as in bread, custard, pie, and as a vegetable. One of our favorite varieties, the Red Garnet, has a mellow sweetness when you eat it. Best of all, sweet potatoes are gluten-free.

I know, I know, it's a vegetable...but I still get a kick out of saying it. On certain days, I find that it's important to remember all the things I can eat, rather than focusing on the things I can't. It helps to remember these things when you begin to feel that shopping for food has become a gluten war zone. I start imagining that space ships are zooming through the air shooting gluten globules at my van trying to stop me keep me from goal of finding gluten-free food.

The holidays are particularly bad for creating this effect on me. For both my husband and myself our family tradition was for holiday meals to be a special family celebration. With the Easter holiday coming up, I've been thinking about menus that we can have and these thoughts were on my mind while we were in Virginia last week. Since we moved to New York a few years ago, living here has created an expectation that there will be a certain amount of gluten-free food available for the Jewish holiday, Passover. I thought of this while I was shopping with the kids in McLean and I saw a bakery with a sign out front stating that they had all the Passover bakery items that you need. Wow, could it mean that they would have gluten-free Passover foods? My kids and I decided to take the chance and scope out their food. When we didn't find anything, so I asked the young lady behind the counter if they had anything that was wheat or gluten-free. She looked at me rather confused and asked me, "What's that?" I guess they don't do anything gluten-free for Passover.

Which brings me back to my dusty pile of Red Garnet sweet potatoes and I remember they are gluten-free. They are versatile, nourishing and healthy. The tuber will yield a scrumptious sweetness that feeds my southern soul and make me forget the world of gluten.

Recipe

1 lb Red Garnet Sweet Potatoes, quartered
6 Tb Olive Oil
3 garlic cloves, minced
1 tsp sea salt
1 tsp coarsely ground black pepper
½ yellow onion, sliced thinly
1 tablespoon dried rosemary

Preheat oven to 425 deg. F. Pour olive oil into an oven proof baking dish (6 x 10). Then add the sweet potatoes, onions and sprinkle the spices over the top. Using your hands evenly coat the vegetables in the spices and olive oil. Place into the oven to roast for 1 hour. Stir every 15 minutes to ensure even browning. Serves 6.

My children would have preferred to have me leave the rosemary off the sweet potatoes, but my husband and I loved this recipe. It's a keeper.

March 17, 2007

Thank You bloGher!

Kalyn Denny of bloGher, wrote a wonderful article titled, Blogs can Help with Gluten-Free Baking and Cooking. She mentions the existing large network of gluten-free blogs that are available to help individuals locate recipes for gluten-free food and find support. Kalyn mentions a number of excellent gluten-free blogs to explore. To read Kalyn's blog recommendations and article go to: http://blogher.org/node/14659.

March 16, 2007

Pasta Sauce - Gluten Free & Nightshade Free

Living Without Magazine, published an article in their Fall 2005 issue called, "No More Nightshades." The article has a recipe for a nightshade free and gluten-free pasta sauce that I have been wanting to try out for my daughter. She has a slight reaction when eating nightshade plants.

The base of the sauce is oven roasted beets and canned pumpkin with the addition of spices and red wine vinegar to make it more like a pasta sauce based on tomatoes.

I made up a half batch of the sauce, taking care not to over cook the beets. I was having problems with their recommended amount of seasonings though...the sauce seemed to absorb the spices no matter how much I added.

The overall taste was oddly sweet due to the roasted beets and canned pumpkin, but the sweetness was spoiled by the flavor of the red wine vinegar. I think oven roasted beets and pumpkin have a brighter future as a vegetable dish, rather than in pasta sauce.

To learn more about Living Without Magazine, visit their website at: http://www.livingwithout.com/

February 11, 2007

Blueberry Mesquite Cornbread Muffins - Gluten Free

The gluten-free blueberry muffin idea was born at Trader Joe's while looking at a package of Wild Blueberries from Canada. I remembered that blueberries and cornbread are great together. My shopping companions made sure that the blueberries made it into the cart and off we headed to the checkout line.

I started with my basic cornbread recipe (December 1, 2006 post) and started by dividing the recipe in half. Then I substituted mesquite flour for the sweet rice flour and almond meal. I added 1/3 cup of blueberries to the recipe and topped the muffins with more blueberries and Turbinado sugar. They turned out beautifully. Tasting them was so sad...they were bland and the blueberries didn't taste like blueberries. The basic muffin didn't taste like cornbread at all. Overall, they had a bland generic berry flavor.

Back to the planning stages for this recipe. I began by adjusting the amounts of mesquite and arrowroot flours, then added back the sweet rice flour. I was ready to try again. I mixed, baked and tasted the second batch. Wow, they tasted like mesquite cornbread and better yet the flavor of the blueberries stood out.

Recipe

Muffins:
1 cup + 1 Tb yellow cornmeal
1/3 cup + 2 Tb brown rice flour
1/4 cup arrowroot flour
1/4 cup mesquite flour
2 Tb sweet rice flour
1/4 cup Turbinado sugar
1 cup of milk
1 1/2 tsp kudzu powder, dissolve in the milk
1 egg, beaten
2 tsp baking powder
1/2 tsp sea salt
4 Tb vegetable shortening

Tops:
1/4 to 1/3 cup of blueberries
1/4 cup Turbinado sugar

Preheat oven to 350 degrees and line a 12 cup muffin tin with paper cups.

For mesquite cornbread muffins:
In a mixing bowl combine all the dry ingredients and blend. In another mixing bowl (I used my stand mixer for this), place the vegetable shortening and began blending. Add the egg and milk, continue blending. Add the dry ingredients to the stand mixer bowl. Blend quickly, taking care not to blend too much. Spoon mix into the paper cups. Bake for 20 to 25 minutes.

For blueberry muffins:
Spoon the batter into the muffin cups. Then top the muffins with blueberries and lightly press down. Sprinkle Turbinado sugar over the tops. Bake for 20 to 25 minutes.

They turned out beautifully and have a lovely aroma. They taste great. The flavors of mesquite and cornbread come through and the blueberries add a delightful sweet flavor. They hold together very well and don't fall apart when you bite into them.

Where are my judges? This morning I lost out to fried rings of gluten and sugar. Otherwise, known as the doughnut. I'll keep trying and let you know what they say...

January 21, 2007

Thanks, Eating Britain!

I was tickled pink when I saw that Sarah from Eating Britain said that Gluten A Go Go was one of five must read gluten free blogs. Thank you Sarah! You can read her article at:
http://www.eatingbritain.com/157/5-must-read-gluten-free-blogs/

January 17, 2007

Toll House Kookie Brittle (Gluten-Free)

I grew up loving Toll House Kookie Brittle. While it is baking the house smells so good that you can't wait for the cookies to come out of the oven. My Mom always made these for the holidays or whenever we could convince her to make them. Developing a gluten-free version of Toll House Kookie Brittle has been on my wish list ever since my diagnosis.

We belonged to a church outside of Marquette, Michigan, during the early 1960's. The ladies of the church put together their incredible baking prowess and made a cook book. This book is invaluable to me for the variety and number of fine recipes that it contains. I have made many of them and I will endeavor to bake my way through the others. (I mentioned this book in an earlier post on Pumpkin Bread.)

The origin of this recipe was probably the Toll House folks and it made it's way into the church cook book. Since, I'm not sure who originally created it - I salute them all! This is a fine cookie recipe.

The change to gluten free took a couple of test bakes. The first batch turned out to have too much butter and not enough flours. I added kudzu powder to help hold the cookie together. Since this batch was too oily from the butter, I had to go to batch two. In this one I added more flours and I left out the kudzu powder. I wanted to see if the cookies would hold together without the kudzu. Batch two turned out beautifully and they hold together. So, how did I adapt it to be gluten free? Like this...

Recipe (1/2 recipe made in a 8 x 12 pan)

1/2 cup butter
1 tsp vanilla
1/2 tsp sea salt
1/2 cup sugar
1/3 cup brown rice flour
1/3 cup oat flour
1/3 cup sweet rice flour
1/3 cup arrowroot flour
3 oz. mini chocolate chips
1/2 cup pecans, chopped

Preheat the oven to 350 degrees. Line an 8 x 12 pan with parchment paper. Soften the butter.

After the butter is softened, put it in a mixing bowl and cream. Then add the sugar, vanilla and salt. Place all the flours in a bowl and mix. Once the butter mixture is blended slowly add the flour mixture. Once blended take the cookie dough and place it onto the cookie pan.

Then break up the dough into bite sized chunks and spread them around the sheet. Begin to press the cookie dough down with your fingers and cover the entire bottom of the pan with dough. (If the dough sticks to your fingers you can dampen them with a little water.) Sprinkle the top of the dough with the mini chocolate chips, spreading them around with your finger tips. Then lightly press the chips into the dough. Next sprinkle the chopped nuts onto the top of the dough and lightly press in.

Bake for 20 to 25 minutes or until golden brown. After you remove them from the oven, take a sharp knife and gently score the top of the cookies into standard sizes. Or you can let the pan cool and break the cookie sheet into irregular pieces like candy brittle.

What did my tough critics have to say? My son couldn't stop bouncing around the kitchen asking me, "Are they cool yet?" Once they were cool, he zoomed in for the attack and raced off with two cookies. He came back a minute later and asked if he could have some more. "So? What did you think?" I asked him. He started bouncing up in the air touching his heels together, saying "I like 'em!" Now my daughter (who is now The Toughest Critic in the house) looked at him trying to gain real altitude and said, "Really?" "Yeah!" he replied. She went to get a cookie and bit into it. She sat back down and quietly started chewing. She kept eating. I couldn't take it anymore... I blurted out, "So?" She put her thumb up and said, "Mmmmmm...good." Still airborne, my son said, "Really?" She smiled.

The kid judging was over. Well...except for the dog who very very patiently followed my son around picking up every single crumb that fell on the floor. As I put away a few cookies for my husband to try when he got home, I wondered if there were any clues to be hand in this sibling exchange. Let's see....good food causes my son to go airborne, if brother goes airborne then the food is really good, "I like 'em" is more emphatic than "Umm...their good," less talking and more eating means it better. I guess I could explore the sibling nonverbal signals next.....

Oh yes, I forgot to tell you about the pictures. There are nuts only one half of the cookies - it's the adult & Sheltie side. The chocolate chip only side is for the kids & the Sheltie.

January 1, 2007

Sweet Potato Hash - Gluten Free

I love sweet potatoes! There are so many beautiful varieties of sweet potatoes at the grocery store right now, I couldn't resist. This recipe for gluten-free Sweet Potato Hash is made with the small organic Ruby sweet potatoes that I found at Trader Joe's.

Potato hash is down home Southern fare for us. The variation to sweet potatoes makes a wonderful addition to our breakfast menu, plus it's nightshade free.

(Note: Three cheers for anyone who guessed that I photographed the hash on a Pikachu plate.)

Recipe

6 small Ruby sweet potatoes
1 onion, halved and sliced
1/2 bell pepper, halved and sliced
coconut oil
salt and pepper to taste

Wash, peel and cube the sweet potatoes. Put a pot of water on the stove and bring to a boil. Add the sweet potatoes and cook until tender. While the potatoes are cooking, put a tablespoon of coconut oil in a skillet and cook the onion until it is clear. Add the bell pepper and cook for a few more minutes. Remove the potatoes from the water and add to the onions and bell pepper. Cook long enough to blend the flavors together approximately 5 to 8 minutes.

My food critics had mixed reviews about the sweet potato hash. First, my husband and I loved this recipe. This is warm and homey food. My kids only liked the sweet potatoes. They didn't like the onions. The kids tested the hash without the bell pepper, since my daughter has a slight nightshade allergy. I cooked the bell pepper in a separate skillet and added it to the hash once the kids were served.

October 7, 2006

Pamela's Gluten Free Pancake Mix - Revisited


I've wanted to try using Pamela's Gluten-Free Pancake Mix again to see if I could make another good batch of pancakes. The previous batch was pretty nasty.

The pancake batter turned out too gooey and stuck to the skillet horribly. I wondered what could have gone wrong, since the previous batch has been so good. It could have been a couple of things, there could have been product settling in the bag or during the packaging process the ingredients are added to the bag in layers and not as a blend.

Just in case either of my ideas was the source of my pancake problem, I emptied out the bag of mix into another container and mixed well. Then I made the basic pancake mix and did a taste test. Yep, pretty typical gluten-free flavor...bland. I have to mess with food that tastes this dull...I can't help it. So, I went to town making banana nut pancakes. Here's what I did:

Gluten Free Banana Nut Pancakes

1 cup Pamela's Pancake Mix
1 large egg
3/4 cup + 2 Tb of water
1 Tb Grapeseed Oil
1/4 cup almond meal
2 small bananas, mashed
1/4 cup chopped pecans

Mix the ingredients together. Mix shouldn't be too thick or too thin. Heat skillet with some grapeseed oil on medium low heat. Pour 1/4 cup batter or smaller amount into pan and cook until golden brown and flipped once.

This time they turned out beautifully. My small array of food critics loved them...even the guy who doesn't like syrup or butter on his pancakes. They were very tasty. The mix didn't stick to the pan and cooked up just like they were supposed to...YEAH!

October 2, 2006

Peanut Butter Sauce Pan Cookies - Gluten Free

One of my family's favorite recipes is gluten-free, Peanut Butter Sauce Pan Cookies. My baking record is three batches in a row of these cookies when we've had family over.

I've done a little tweaking to the recipe which my mother received from her friend Deannie about 45 years ago, so the flavor is a richer chocolate rather than like cocoa.

Recipe

1 stick butter
2 cups cane sugar
1 1/2 squares semi-sweet chocolate
1/2 cup milk or half 'n half
2 tsp vanilla
1/2 cup + 2 Tb crunchy peanut butter
3 1/2 cups quick rolled oats

Get all of your ingredients together and measured out before starting. Once the chocolate mixture is boiled it will set up before you have time to measure everything out.

Place butter, sugar, chocolate and milk in a large sauce pan. Stirring constantly, bring to a boil. Boil for 1 minute. Remove from heat and add in vanilla, peanut butter and oats. Blend well. Drop by spoonfuls onto parchment paper. Allow 15 minutes for cookies to harden enough to eat.

All of my family loves these cookies. They are a family favorite that disappear quickly.

Source for Gluten Free Oats

The latest Living Without Magazine mentioned a Montana based company called Gifts of Nature which is now carrying certified gluten free oats. They also carry Montina flour and lima bean flour. You can find out more from their website, http://www.giftsofnature.net

September 30, 2006

Banana Bread Gluten-Free

Cooler fall weather seems to create cravings for warm quick breads like pumpkin, sweet potato and banana. I had five pretty ripe bananas, so it seemed my kitchen mission was clear. It would be gluten-free banana bread.

I selected my family's favorite wheat based banana bread recipe, which is from a church we belonged to in the early 1960's, as the to modify to be gluten free.


Recipe

1 stick of salted butter
1 cup sugar
1 egg
3 mashed ripe bananas
1 cup brown rice flour
3/4 cup oat flour
1/4 cup + 1 Tb sweet rice flour
1 1/2 tsp kuzu starch
1 Tb water
1 tsp baking soda
1/2 sea salt

Dissolve the kuzu starch in the water. Cream butter and sugar then add the egg. Alternately add flour mixture and mashed bananas and kuzu liquid. Bake in a parchment paper lined loaf pan for approximately 1 hr 15 minutes at 350 degrees. Note: I covered the bread at 50 minutes so it wouldn't get too brown on the top.

How did this recipe go over with my tough food critics? My husband and the kids loved it and liked that the half slice held up in their hands. They said I could make this recipe again. I liked the way this bread turned out. It's moist and has an excellent banana flavor.

September 22, 2006

Millet Pizza - Gluten Free

I found a gluten-free pizza crust recipe at Epicurious.com. It had been published in the November 2005 edition of Gourmet magazine. I hadn't made a gluten free pizza in a while, so I decided to give this recipe a try.

I made a slight adjustment to the brown rice flour mix in the recipe and removed the potato flour, since my daughter has a slight reaction to nightshade plants, so I used millet flour instead. This is what I did:

Pizza Crust

1 tsp olive oil and more for brushing
1 Tb cornmeal
1 cup brown rice flour mix
1/2 cup millet flour
1 Tb agar dissolved in the water
1/2 tsp salt
2 tsp sugar
1 package yeast
1/2 to 3/4 cup of warm water plus 1 Tb

Brown Rice Flour Mix

1 2/3 cup brown rice flour
1 cup oat flour
1/3 cup cornstarch

I used my pizza stone as my pan and didn't preheat the stone. Preheat oven to 425 degrees.

Mix the dough together and allow to stand 40 minutes to rise. Then transfer the batter onto the pizza stone that has been covered in cornmeal. Press out the dough into a pizza shape sprinkling cornmeal as you need to keep the dough from sticking to your hands.

Then cover with your choice of pizza toppings and bake for 15 minutes or until nicely browned.

So what did it taste like? A bit like a whole wheat pizza. I had doubled the crust recipe and the crusts on my pizzas were thicker. The crust came out nice and crispy on the bottom so that the slice would hold up for you to eat with your hands.

My kids said the crust turned out too thick and that the crust tasted sort of okay. But they really didn't care for it too much. My husband really liked the taste of the crust, but wanted it to be thinner too. I thought the pizza needed to be thinner, but it did taste good. It was best warm right out of the oven, rather than cold.

We all liked the crispy crust on this pizza since I had cooked it on the stone rather than a pan. The stone worked very well even though it wasn't warmed in the oven.

September 20, 2006

Beer Batter Bread Gluten-Free

I had been reading Farmgirl's post on Beer Bread and was fondly remembering eating a yeast version of Beer Bread in years past. Since I had an unopened bottle of Ramapo Valley Gluten-Free Passover Beer in the fridge, I decided to modify Farmgirl's quick version of Beer Bread a try.

The recipe that Farmgirl uses is based on the Beer Bread recipe found at Epicurious.com. I modified her whole wheat version of the bread to make it gluten free. This is what I did:

Recipe

1 cup oat flour
1 cup millet flour
1 cup sorgham flour
1 Tb granulated sugar
1 tsp salt
1 Tb baking powder
14 ounces GF beer or 12 oz beer & 2 oz water
1 1/4 kuzu powder dissolved in the 2 oz of water
Optional Egg Glaze: 1 beaten egg & 2 tsp water

Preheat oven to 350 degrees. Line a 4 x 8 loaf pan with parchment paper. Combine all dry ingredients in a mixing bowl. Add the dissolved kuzu and water to the beer. Then pour both liquids into the dry ingredients. Stir only enough to blend and lumps are okay. The batter will be thick. Pour into parchment lined pan and bake for approximately 1 hour or until a toothpick inserted into the center comes out clean. Remove from oven and allow to cool. Serve warm or at room temperature.

The bread turned out beautifully, although it had too strong of a taste for my kids. They didn't care for it even with butter. The texture was beautiful although slightly crumbly when cut. It still held together enough to take bites out of the slice I covered with cheese. The bread tasted the best with savory companions, such as Emmenthaler cheese or pepperoni. However, it was quite tasty with just butter too.

This bread is better to eat within the first couple of days. After the third day the after taste becomes stronger until it is almost as strong as the aged Emmenthaler cheese.

September 17, 2006

Chocolate Chip Cookies Gluten Free - Version #3

The gluten-free chocolate chip cookie is a required staple at our house. I've made this recipe more than any other. Since it is one of my children's favorite cookies, it does require continuous baking trials to tweak the recipe to get a finer taste.

I think this version will become the staple at out house. They were perfect. Beautiful on the baking sheet and scrumptious to eat.

Here's what I did:

Recipe - Version #3

2 sticks organic butter
3/4 cup packed brown sugar
3/4 cup granulated cane sugar
1 tsp vanilla extract
2 eggs
1 tsp baking soda
1 tsp salt
1 1/4 tsp kuzu powder dissolved in 1 Tb water
1/3 cup Montina flour
1/2 + 1 Tb sweet rice flour
1 cup oat flour
1/2 cup brown rice flour
2 cups chocolate morsels
Optional: 1 cup chopped nuts

Beat the butter until creamy, then add the brown and granulated sugar. Add vanilla flavoring. Add one beaten egg at a time. Add the dissolved kuzu. Slowly add flours, soda and salt. Once blended add chocolate morsels. Place cookie dough into the refrigerator to chill down.

Preheat oven to 350 degrees. Place spoonfuls of chilled cookie dough on a parchment paper lined baking sheet and bake for approximately 12 minutes or golden brown. Allow to cool before removing the cookies from the baking sheet.

This variation was an instant hit. I made them on Wednesday and by Friday they were gone. This version got four yes votes. I think given the speed that the cookies disappeared...it's a keeper.

What makes this the best version yet? This version lacks xanthan gum. The kuzu powder adds just that bit of cohesion and improved texture that the cookies needed. Using more oat flour than brown rice flour helped to keep the cookie texture smoother and less grainy. Plus, the cookies didn't have the lingering after taste of rice flour. The taste isn't that bothersome unlike the xanthan gum. However I've been trying to achieve that pure rich lingering taste that you got when you had a wheat chocolate chip cookie....rich and chocolatey. I think this version comes the closest so far.