Showing posts with label cookies. Show all posts

April 16, 2008

Little Devil & Panda Cookies


The first time my children saw the Horlicks Doggie Cookies, they were enchanted. The original recipe by Thng Lay Teen, who writes for The Straits Times of Singapore, was a celebration of the beverage Horlicks. A beverage said to promote sleep and is very popular throughout Asia. This cookie can also be found in a chocolate version using Nestle's Milo drink and a Horlicks free version.

With my daughter's dairy allergy to consider, the challenge was to create a malty tasting cookie that didn't have any malted milk powder. After contemplating all the different gluten free grains, I decided on using millet. It would give a more robust flavor that is also slightly malty.

Millet is a gluten free grass that is grown around the world and was the primary grain of Neolithic China and Korean Mumun societies. At Cishan, China, archaeologists found underground storage pits that were used to store foxtail millet. This site dates back to 6000-5500 BC. Millet also has the honor of making the oldest noodles found to date. They were unearthed in 2005 by an archaeology team working in Lajing, China. They appeared to have been buried in an ancient cooking pot by a catastrophic flood that hit the Yellow River area about 4,000 years ago.

Due to it's being easy to grow in problematic soil conditions, millet is an important nutritional source to many cultures around the world. It is high in vitamin B, fiber, calcium, manganese, iron, magnesium and is comparable to wheat in protein content.

The cookies are mild in flavor and slighty malty with the texture of pecan sandies. The dough mixed up quickly, but it takes a little while to decorate all the little devil and panda faces. The first few I made looked like the Horlick's doggie cookies and some looked like pandas. However my children thought the doggie version looked too sad, but they liked the happy little panda. Then I showed them the little devil version I made with the Koala Crisp, a chocolate puffed rice cereal. My kids were thrilled with their appearance and preferred the devils over the floppy eared dogs. My daughter leaned over and added a Koala Crisp to the backside of the devil exclaiming, "Now, it's a real devil Mom!"

These cookies were a hit with my family. We preferred these cookies slightly warmed up, as it made the chocolate in the center all soft and melty. The warm chocolate center was a nice compliment to the sandie texture of the cookie.

I'm submitting this recipe to the April edition of Sugar High Friday. This month it is being hosted by La Petite Boulangette, with the theme of Sweet Asian Invasion.


Recipe

Cookie

2/3 cup (100 g) millet flour
1/4 cup (50 g) sweet rice flour
1/3 cup (50 g) arrowroot starch
2 tsp chia seed meal
1/2 cup + 2 Tb (50 g)powdered sugar
1/2 cup + 1 Tb (125 g) vegetable shortening
2 tsp vanilla extract
3 Tb chilled almond milk


Filling & Decorations

Mini Chocolate Chips (Enjoy Life)
Envirokidz Amazon Flakes cereal (corn flakes)
Envirokidz Koala Crisp cereal (chocolate puffed rice)
Chocolate Jimmies (Sprinkelz)

1. Preheat the oven to 325 degrees Fahrenheit. Line a cookie sheet with parchment paper. Set out all of your cookie decorations and filling in small bowls. Then set out a piece of parchment paper on the counter for your work area.

2. In a large bowl, dump in the flours, chia seed meal and powdered sugar. Stir to thoroughly mix the chia seed meal with the other ingredients.

3. In the bowl to your mixer, plop in the vegetable shortening and beat until fluffy. Pour in the almond milk and vanilla. Then slowly add the dry ingredients. Mix until the ingredients form a soft dough.

4. Remove the bowl from the mixer and using a spoon, scoop out a small amount of dough. Then press the dough out in your hand until it resembles a small bowl. Place a few chocolate chips or a few chocolate chips and a corn flake into the bowl. Then press the sides of the bowl down onto the center to seal the cookie. Gently roll the dough ball between your palms to shape it and then place on the cookie sheet.

5. Place a chocolate chip in the lower half of the dough ball for the mouth. Then press two indentations above the chocolate chip with a toothpick and set 2 Jimmies into them for the eyes. For the little Devils, press two rice puffs in the top of the dough ball for ears and then press 1 rice puff on the backside for the tail. For the little Pandas, press the corn flakes into the top of the dough ball for the ears.

6. Bake at 325 degrees Fahrenheit for 15 to 20 minutes. Makes 18 medium sized cookies or 36 mini cookies. Note: If you want the center to be soft and gooey, warm the cookies slightly before serving.

Substitutions:

You can use 1 tsp of xanthan gum or guar gum to replace the chia seed meal in this recipe. If you want to use a gluten free flour blend in place of the flours, then use 1 1/4 cup of the gf flour blend and do not add chia seed meal, xanthan or guar gum.

February 22, 2008

Finish Fingers


When I told our children that I was going to make Finnish Fingers, they weren't overjoyed. They thought I was going to make Halloween party food that was shaped like real fingers. Not fans of spooky food, they started working on their best pleading skills to keep me from making the cookies. As soon as I could get a few words into a very one sided conversation, I began to make my case for trying out a new cookie recipe, one that didn't have anything to do with food masquerading as body parts. Once I described the cookies as a sweet confection decorated with chocolate toppings, they were far happier.

Finnish Fingers (Finska pinnar) are a traditional favorite not only in Finland, but throughout Scandinavia. Full of character and flavor, Finnish Fingers are an enjoyable to make and fun to eat. The recipe that I used came from "Things Swedish," by Mari Hemming (Albert Bonniers Forlag, 2001). I substituted vegetable shortening and coconut oil for the butter, used gluten free flours in place of the wheat and used chia seed meal as the binder. The glaze recipes came from the Fanny Farmer cookbook and are found on my post for Chocolate Chestnut Doughnuts.


Once they were ready to eat, my family moved in and by Friday there was one lone Turbinado sugar cookie left. Most of us thought they were delicious. My son preferred the ones with the crunchy sugar outside and my husband and I liked those with the chocolate glaze and almonds. My daughter decided she would rather eat the gluten free chocolate chip cookies that I made. This recipe made two dozen cookies, a nice size for having around or for saving out a few and freezing the rest. This recipe is a keeper as it's perfect for when you are in the mood for something very enjoyable and a little different.

This post was submitted to the monthly event, Does My Blog Look Good In This, hosted this month by Bake or Break.

Recipe

Cookie

7 Tb vegetable shortening
7 Tb coconut oil
1/2 cup cane sugar
1/2 cup brown rice flour
1/2 cup chestnut flour *
1/2 cup sweet rice flour
1/4 cup + 1 Tb arrowroot starch
1/2 cup almond meal
2 tsp chia seed meal **
1/2 tsp almond extract

Toppings

Turbinado sugar
Sprinkelz
Chopped almonds
Chocolate Glaze
Vanilla Glaze

1. In the bowl to your mixer, cream the shortening and coconut oil. Then slowly add the cane sugar.

2. In a medium bowl, dump in the flours and meals. Then stir together.

3. Slowly add the flour mixture to the sugar mixture in the bowl of the mixer. Once blended. Plop in the almond extract and continue to blend.

4. Remove the bowl from the mixer and place in the refrigerator to chill for at least 30 minutes.

5. Line several cookie pans with parchment paper. Then place a sheet of parchment paper on the counter for a surface to roll the cookies.


6. Remove a scoop of dough and make a ball in your hands. Then slowly roll the ball on the counter until it forms a log that is the thickness of a finger and about 2 inches long. Then place the cookie on the cookie sheet. Repeat until all the cookies are formed.

7. For cookies covered in Turbinado sugar: Roll the uncooked cookie in the sugar and replace on the cookie sheet.

8. Then chill the cookies in the refrigerator for about 20 minutes. While the cookies are chilling, preheat the oven to 350 degrees Fahrenheit.

9. Remove the cookies from the refrigerator and place in the oven. Bake for 15-17 minutes. Remove from the oven and allow the cookies to completely cool before decorating them. Makes 2 dozen cookies.

1o. For the Chocolate and Almond Cookies: Gently pick up a cookie and sprinkle chopped almonds on the parchment paper were the ends of the cookie had been resting. Then dip each end of the cookie in the chocolate glaze and allow the excess to drip off. Replace the cookie on the cookie sheet so that the chocolate ends are resting on top of the chopped almonds. Then sprinkle chopped almonds over the chocolate glazed tops of the cookies. Allow the chocolate to set before serving.

11. For Vanilla Glaze and Sprinkelz Cookies: Gently dip one end of the cookie into the vanilla glaze and allow the excess to drip off. Then roll the glazed end of the cookie into a bowl containing the Sprinkelz. Repeat this on the other end of the cookie. Once decorated, replace the cookie on the parchment paper. Allow the glaze to set before serving.

* Chestnut flour: You can purchase chestnut flour at your local Whole Foods, Glutenfree.com and the Glutenfreemall.com

** Chia Seed: You can purchase chia seed from Native Seeds/SEARCH. Then I grind them in my coffee grinder to make a meal that works as a binder in place of xanthan or guar gum.
January 5, 2008

Oat Flakes - Gluten Free


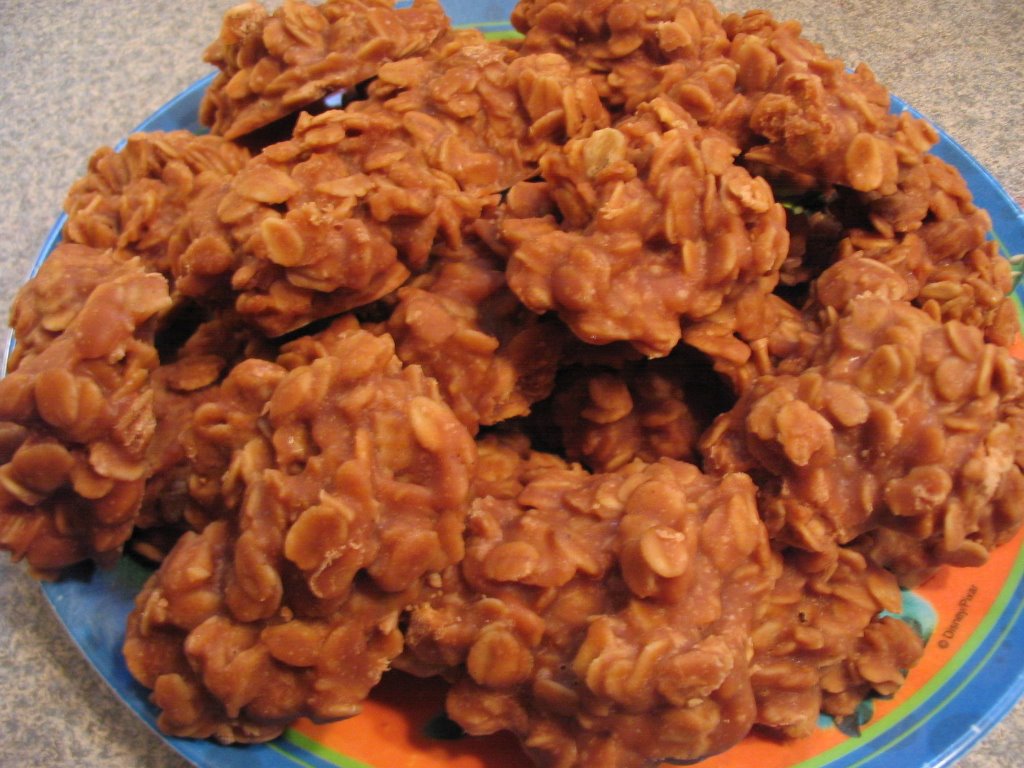
One of the recipes in The Professional Pastry Chef (Friberg, 2002) that I've been wanting to try is for a beautifully crisp cookie called Oat Flakes. The cookie spreads out while baking into an oblong shape. Once the cookie has cooled, you dip one end in dark chocolate. With the end result is a cookie that resembles a rolled oat.

Since I have a great fondness for oats. They find their way into many of the dishes I make at our house, such as Peanut Butter Sauce Pan Cookies, Cinnamon Raisin Oatmeal, Pizza or Oat Milk. With my stock of certified gluten free oats recently replenished, it was time to give this cookie a try. The recipe called for very little wheat flour and could be changed to be gluten free easily. I also wanted to try making them with agave syrup rather than sugar in order to reduce the glycemic index of the cookies.

The cookies emerged from the oven a golden toffee color and smelled delightful. After the cookies had cooled, my children took over and had a great time dipping the cookies into the dark chocolate. We did leave some plain to see which ones we preferred. The four of us thought the chocolate covered cookies were delicious and were our favorite. We took to folding our cookies in half, so that every bite had some chocolate in it.

Recipe

1/2 cup + 1/2 tsp (128 g) melted butter
1 1/2 cup (155 g) certified gf rolled oats *
1 egg, beaten
2/3 cup (234 g) agave syrup
5 1/2 tsp (16 g) brown rice flour
5 1/2 tsp (16 g) sweet rice flour
1 1/2 Tb (18 g) baking powder
1/4 - 1/2 cup Dark Chocolate, melted

Note: This recipe is reduced in size from the original.

1. In a large mixing bowl, pour in the melted butter and oats. Beat together on low speed. Dump in the egg and agave syrup and continue beating.

2. In a small bowl, combine the flours and baking powder. Stir together. Then add to the large mixing bowl and beat together.

3. Cover the mixing bowl and place in the refrigerator preferably overnight, but at least 4 hours.

4. Cover several cookie sheets with parchment paper. Preheat the oven to 375 degrees Fahrenheit.

5. Scoop out the batter into balls about the size of 1 tablespoon. Give the cookies room to spread. Bake for 8 to 9 minutes or until the entire cookie is a light toffee color.

6. Allow the cookies to cool and then set up. Then remove each cookie from the parchment paper and dip into the melted chocolate about halfway. Replace on the cookie sheet and allow the chocolate to dry, approximately overnight. Note: The cookies will still be somewhat soft after cooling.


* You can purchase certified gluten free oats from Cream Hill Estates, Gifts of Nature, Gluten Free Oats, Bob's Red Mill, Glutenfree.com and Glutenfreemall.com.

December 19, 2007

Tiger Cookies - Gluten Free


Each time I get ready to make any baked goods, there is a standard discussion between my children..."I want chocolate," says my daughter..."No, this time it needs to be vanilla," says my son. And on it goes until the discussion ends in the toss of a coin. Only to return again when I begin to gather my baking ingredients together in the kitchen.

Our Sheltie is the ultimate diplomat. She likes to have a taste of just about anything you are eating. She will delightedly remain at your side enjoying your company and whatever tidbits you choose to share with her. When it comes to flavors, she likes chocolate, vanilla, chocolate and vanilla swirled together. Following her example, I wanted to make a gluten free cookie that would please both of my children at the same time.

I have an old recipe for Tiger Cookies made with melted chocolate chips and corn flakes that I thought had the potential to save us from the flavor discussion. The recipe comes from Christmas Cookies by Oxmoor House that I've had for many years. I've modified the recipe to be gluten free and added flax seed meal as a binder so that the cookies will hold together nicely.

The cookies smelled delicious and maintained their lovely shaped look during baking. In spite of children's dubious glances at the multicolored cookies, their first taste showed them that cookies don't have to be just chocolate or just vanilla. Chocolate and vanilla are very delicious all swirled together.

Recipe

9 Tbs (1 stick + 1 Tb) butter
1/2 cup + 1 Tb cane sugar
1 egg
1/2 tsp vanilla extract
3 tsp flax seed meal
3/4 cup brown rice flour
1/2 cup sweet rice flour
1/2 cup arrowroot starch
1/4 cup corn flour *
1/2 tsp baking soda
1/4 tsp sea salt
1 1/2 cup frosted cornflakes, crushed **
3 oz. semisweet chocolate morsels

1. Preheat the oven to 375 degrees Fahrenheit and line a cookie sheet with parchment paper.

2. In a large mixing bowl, dump in the butter and cream. Beat on medium speed, then plop in the sugar and beat until light and fluffy. Pour in the egg and vanilla extract and continue to beat. Once blended, add the flax seed meal and beat until thoroughly blended. Allow the mixture to sit and rest. This will allow the flax seed meal to begin gelling.

3. In a medium bowl, dump in the flours, baking soda, sea salt and crushed corn flakes. Stir until blended.


4. Slowly pour the dry ingredients into the mixing bowl and beat on medium speed until it makes a collection of large and small blobs of dough.

5. Place the chocolate chips in a measuring cup and melt in the microwave or put them in the top of a double boiler and melt them. Pour the melted chocolate around the top of the dough balls. Using a spoon, lightly stir the chocolate into the dough until it makes multicolored dough balls.

6. Using a spoon, scoop out some cookie dough and place into the palm of your hand. Lightly press the dough together until it makes a nice sized ball (approximately 1 inches in diameter). Then set it on the cookie sheet. Continue in this manner until you have covered your cookie sheet with dough balls with a couple of inches between each ball.

7. Bake for 10-12 minutes at 375 degrees. Remove from the oven and allow to cool before serving. Yield: 2 1/2 dozen cookies.

What did my family think of tiger cookies? We all thought they were delicious. This recipe is now a keeper at our house.

* Corn Flour: You can buy gluten free corn flour from Authentic Foods or from Shiloh Farms carried by the Gluten Free Mall.

** Frosted Corn Flakes: I used Envirokidz Organic Amazon frosted flakes cereal which is gluten free. I purchased my box at my local Whole Foods, but they are also available at Glutenfree.com.

January 17, 2007

Toll House Kookie Brittle (Gluten-Free)

I grew up loving Toll House Kookie Brittle. While it is baking the house smells so good that you can't wait for the cookies to come out of the oven. My Mom always made these for the holidays or whenever we could convince her to make them. Developing a gluten-free version of Toll House Kookie Brittle has been on my wish list ever since my diagnosis.

We belonged to a church outside of Marquette, Michigan, during the early 1960's. The ladies of the church put together their incredible baking prowess and made a cook book. This book is invaluable to me for the variety and number of fine recipes that it contains. I have made many of them and I will endeavor to bake my way through the others. (I mentioned this book in an earlier post on Pumpkin Bread.)

The origin of this recipe was probably the Toll House folks and it made it's way into the church cook book. Since, I'm not sure who originally created it - I salute them all! This is a fine cookie recipe.

The change to gluten free took a couple of test bakes. The first batch turned out to have too much butter and not enough flours. I added kudzu powder to help hold the cookie together. Since this batch was too oily from the butter, I had to go to batch two. In this one I added more flours and I left out the kudzu powder. I wanted to see if the cookies would hold together without the kudzu. Batch two turned out beautifully and they hold together. So, how did I adapt it to be gluten free? Like this...

Recipe (1/2 recipe made in a 8 x 12 pan)

1/2 cup butter
1 tsp vanilla
1/2 tsp sea salt
1/2 cup sugar
1/3 cup brown rice flour
1/3 cup oat flour
1/3 cup sweet rice flour
1/3 cup arrowroot flour
3 oz. mini chocolate chips
1/2 cup pecans, chopped

Preheat the oven to 350 degrees. Line an 8 x 12 pan with parchment paper. Soften the butter.

After the butter is softened, put it in a mixing bowl and cream. Then add the sugar, vanilla and salt. Place all the flours in a bowl and mix. Once the butter mixture is blended slowly add the flour mixture. Once blended take the cookie dough and place it onto the cookie pan.

Then break up the dough into bite sized chunks and spread them around the sheet. Begin to press the cookie dough down with your fingers and cover the entire bottom of the pan with dough. (If the dough sticks to your fingers you can dampen them with a little water.) Sprinkle the top of the dough with the mini chocolate chips, spreading them around with your finger tips. Then lightly press the chips into the dough. Next sprinkle the chopped nuts onto the top of the dough and lightly press in.

Bake for 20 to 25 minutes or until golden brown. After you remove them from the oven, take a sharp knife and gently score the top of the cookies into standard sizes. Or you can let the pan cool and break the cookie sheet into irregular pieces like candy brittle.

What did my tough critics have to say? My son couldn't stop bouncing around the kitchen asking me, "Are they cool yet?" Once they were cool, he zoomed in for the attack and raced off with two cookies. He came back a minute later and asked if he could have some more. "So? What did you think?" I asked him. He started bouncing up in the air touching his heels together, saying "I like 'em!" Now my daughter (who is now The Toughest Critic in the house) looked at him trying to gain real altitude and said, "Really?" "Yeah!" he replied. She went to get a cookie and bit into it. She sat back down and quietly started chewing. She kept eating. I couldn't take it anymore... I blurted out, "So?" She put her thumb up and said, "Mmmmmm...good." Still airborne, my son said, "Really?" She smiled.

The kid judging was over. Well...except for the dog who very very patiently followed my son around picking up every single crumb that fell on the floor. As I put away a few cookies for my husband to try when he got home, I wondered if there were any clues to be hand in this sibling exchange. Let's see....good food causes my son to go airborne, if brother goes airborne then the food is really good, "I like 'em" is more emphatic than "Umm...their good," less talking and more eating means it better. I guess I could explore the sibling nonverbal signals next.....

Oh yes, I forgot to tell you about the pictures. There are nuts only one half of the cookies - it's the adult & Sheltie side. The chocolate chip only side is for the kids & the Sheltie.

January 12, 2007

Quinoa Almond Butter Cookies (Gluten-Free)

I decided to go ahead and remake the gluten-free Quinoa cookies. I got an idea to substitute almond butter for the peanut butter in the recipe and I couldn't wait to try it out. I whipped up a half batch of cookies to see how the recipe worked and tasted. This half batch will make one dozen gluten free cookies.

Recipe

3 Tb Brown Sugar
1/4 Stick of Butter
1/4 cup Almond Butter
1/2 cup Brown Rice Flour
5 Tb Quinoa Flakes
1/4 tsp Vanilla
1 Tb Sweet Rice Flour
1 Egg
Optional: 1/4 cup chopped almonds mixed in, an almond placed on top or 1/4 mini chocolate chips

Preheat the oven to 325 degrees. Line a cookie sheet with parchment paper. Cream the butter. Add the brown sugar, almond butter, vanilla and egg to the butter and blend. In another bowl put the brown rice flour, quinoa flakes and sweet rice flour together and mix. Then add the dry ingredients to the wet cookie dough and mix until blended. Place by rounded teaspoons on the parchment paper and bake for 12-14 minutes or until done.

Optional: Since these cookies do not spread you can press the dough down for a flatter cookie with a fork or the bottom of a measuring cup. You could also try using a cookie press.

Now to bring out the cookie critics and see what they have to say about my experiment. My son really liked the chocolate chip version, but said they would be even better if they had more chocolate chips. My daughter didn't like them, but said that if she was going to have to eat them then they needed more chocolate chips. She said that the chocolate chips were the best part of the cookie. My husband and I liked them. I thought the dough was pretty versatile as it tasted good with a simple almond on top and very good with the chocolate chips in it.

January 10, 2007

Ancient Harvest Quinoa - Gluten Free

I have a variety of gluten- free Quinoa in my pantry. I have Quinoa flakes and flour from Ancient Harvest and organic Quinoa grain from Trader Joe's. I have made exactly one food item from each and didn't explore further. I really enjoyed the Quinoa with garlic and vegetables that I made with the grains. Although, my kids... I've read that you have to offer new foods to kids at least seven times before they will like it, that leaves six times to go.

NASA is experimenting with different varieties of Quinoa for growing in space. The nutritional profile of quinoa is excellent as it contains protein, fiber, calcium, etc. You can see the nutritional profile of quinoa at Ancient Harvest's website. www.quinoa.net

I chose my box of Ancient Harvest Quinoa Flakes as my test subject. Ancient Harvest has several recipes on the back of the box that seemed like they had potential. One was for Quinoa peanut butter cookies and the other for Quinoa banana muffins. Since, I've never made these before I made sure to cut both recipes in half before starting to work.

Crispy Quinoa Peanut Butter Cookies - Gluten Free

1/4 cup honey
2 tsp + 1/2 tsp brown sugar
1/4 stick butter
1/4 cup peanut butter
1/2 cup brown rice flour
6 Tb Quinoa Flakes
1/4 tsp Vanilla
1/8 tsp baking soda
pinch salt
Optional: 1/4 cup nuts

Preheat oven to 350 degrees and line a baking sheet with parchment paper. Mix the honey, sugar, butter, peanut butter and vanilla in a medium bowl until creamy. Combine the dry ingredients in another bowl. Add the dry ingredients to the mixing bowl and beat until well blended. Drop by rounded teaspoons on the parchment paper. Bake for 12 to 14 minutes. Cool.

As a group the taste testers said these were too sweet. The taste of the honey over powered the other flavors and lingered in your mouth. I agreed with my family on this one. This recipe has potential, but it needs adjusting for sweetness. Also, I think almond butter might lend a better flavor than the peanut butter.

Banana Quinoa Muffins

1/4 cup Quinoa Flour
1/4 cup Quinoa Flakes
1 Tb Honey
1 tsp Baking Powder
1/2 tsp baking soda
1/4 tsp salt
1 banana
1 egg
1 tsp brown sugar (not called for in original recipe)

Preheat the oven to 400 degrees. Line a muffin tin with paper cups. Blend all the dry ingredients together. In another bowl blend the banana, egg and honey. Then slowly add the dry ingredients to the banana mixture. Pour the mixture into the muffin cups. This 1/2 recipe will make 4 muffins. Bake for 20 - 25 minutes or until browned.

My kids didn't care for the muffins. They said they were a bit rubbery. I agreed they were rather unpleasantly rubbery. Although I thought the flavor of the muffin was pretty good. The rubbery texture could have been caused by my putting some water in the unused muffin cups. It was interesting to see how the quinoa was almost steamed by the little bit of water in the cups.

I had one for breakfast the next day and toasted it. It came out beautifully and wasn't rubbery at all. I put a little butter on it and shared it with my Sheltie. She thought it was scrumptious.

December 14, 2006

Rolled & Cut-Out Sugar Cookies - Gluten-Free

One of my biggest challenges in cooking gluten free was making sugar cookies. Many recipes were too bland for my taste or the dough ran during baking and the shapes wouldn't hold. A tasty gluten-free sugar cookie recipe was becoming very important at our house as Christmas was drawing nearer. Many little batches of gluten-free sugar cookies were made, testing the various classic ways of making sugar cookies. This recipe is the winner of our little bake-off.

Traditionally at our house, Santa is left a plate of Christmas sugar cookies and a mug of hot chocolate. My kids really get into the spirit of Christmas. Not wanting the reindeer to feel left out, they require that a reindeer cookie is left for Santa's team. They very thoughtfully rearrange the living room so that Santa's snack is left on a small table by the tree. This arrangement is the best way for Santa, because he can snack while he puts out presents. Creative aren't they...

I've been stalling on making this batch of cut-out sugar cookies, as I wanted to go slowly so I could document and make pictures along the way. I've tried other methods to shorten the process, but without the same level of success. Although it takes a while, this method makes the best cut out cookie.

To begin, I got myself into a comfy cooking mood and set up some mental entertainment. My family joined me and we watched Redwall - Season 1, while we cut-out and baked cookies.

Gluten Free Sugar Cookie Recipe

1/2 lb butter
1 1/2 cups cane sugar
2 eggs
1 tsp vanilla
2 Tb cream with a rounded 1 tsp kuzu powder dissolved in it
2/3 cup brown rice flour + 2 Tb
2/3 cup oat flour + 2 Tb
2/3 cup sweet rice flour + 2 Tb
1/2 cup almond meal + 2 Tb
1/4 tsp sea salt
1/2 tsp baking powder

Note: Freezing or chilling the rolled dough packets comes before baking. Wait to preheat the oven until you are cutting out the cookies and placing them onto the cookie sheets.

Cream the butter, and then gradually adding the sugar. Add the egg, vanilla and cream with kuzu powder in it. Beat thoroughly. In another bowl, mix the all the dry ingredients together. Add this slowly to the butter mixture and blend well. If your dough is too soft add a little extra oat flour to stiffen the dough.

Divide into larger balls that you place in between two sheets of parchment paper. Roll the balls until the dough is between 1/8" and 1/4" thick. Then freeze the sheets making sure that they are lying flat in your freezer.

When the dough is firm remove from the freezer (one pack at a time) and peel the top layer of parchment paper off the dough. Put the top layer of parchment paper on your work surface and flip over the dough onto it. Then peel off the bottom layer. Proceed to cut out cookies. Work quickly before the dough thaws. The dough will probably stick inside the cutters. Use your fingers to ease the cookie shape out of the cutter. (Note: detailed cookie cutters may not work as the dough is still soft and may stick in the corners.)

Once you have cut out the cookies and placed them on the parchment paper lined cookie pan, roll the left over dough into a ball and place it between the previously used layers of parchment paper. Roll to a uniform thickness and then freeze again.

Make sure that the cut out cookies that are on the cookie sheet are still chilled and the dough isn't warm. When the warm cookie dough is baked it spreads more during baking than will the frozen dough and you will lose the cut out shape.

Bake at 325 degrees for 12 - 14 minutes or until golden brown.

The cookies are now ready for frosting and decorating.

As soon as the first batch of cookies cooled, my family swarmed the stove and at least left the parchment paper uneaten. I kept baking and here are some for you to see.

How did they taste? Great! The four family voters all thought the same thing. Our sheltie girl didn't get to vote except on the dough, which she thought was quite tasty. She kept hitting my leg with her head to remind me that she was patiently waiting for more.

Anyway, the cookies turned out with a nice crisp texture and the edges were just slightly blurred. I had trouble with the more detailed cookie cutters (i.e. snowflake, reindeer, angel), but the less detailed ones (i.e. gingerbread man, star, candy cane) worked just fine.

Hmmm...I'll have to work on getting the reindeer cookie for Santa.

November 20, 2006

Mesquite Chocolate Chip Cookies - Gluten Free

One of our native flours is Mesquite, which has the added benefit of being gluten-free. I have been reading various articles and recipes about Mesquite flour and wanted to give it a try. After looking at the various companies that carried the flour, I decided to give order mine from Native Seeds out of Tucson, Arizona.

According to Native Seeds, the flour is a good source of calcium, manganese, potassium, iron and zinc. Additionally, it has the ability to stabilize blood sugar. It's taste is fruity or a caramel-like flavor. I found the flour to have a very pleasant taste which is mild. My kids liked it too.

I took my basic Chocolate Chip Recipe and modified it so that the flavors blended with the Mesquite flour.

Gluten-Free Mesquite Chocolate Chip Cookies

3/4 cup Brown Rice Flour

3/4 cup Oat Flour

1/2 cup Sweet Rice Flour

1/4 cup Mesquite Flour

1 tsp Baking Soda

1 tsp Sea Salt

1 cup Organic Butter

3/4 cup Organic Cane Sugar

3/4 cup packed Organic Brown Sugar

1 tsp Vanilla Flavoring

2 large Organic Eggs

2 cups Chocolate Chips

Optional: 1 cup chopped Pecans

Preheat the oven to 350 degrees. Line a cookie sheet with parchment paper. Then combine the flours, baking soda and salt into a small bowl. In a mixing bowl, cream the butter. Then add the sugars and vanilla flavoring. Add the eggs, beating well after each one. Slowly add in flour mixture. Stir in the chocolate chips and nuts. Drop by rounded teaspoons onto the parchment paper. Bake for approximately 12 minutes or until golden brown. Cool before removing from the parchment paper. (Check the consistency of your batter once you've add all the flours. I added an additional 2 - 3 Tbs of sweet rice flour to make the batter firmer.)

The cookies turned out beautifully. The kids liked them and thought they were a great addition to our range of chocolate chip cookies. I agreed with them. My husband, who hadn't eaten anything gluten-free for awhile, thought that the cookie texture was a bit grainy. I agreed, however, the texture wasn't bothersome like it can be with other flour mixtures. We all agreed - these are worth making again.

Where I bought my mesquite flour:

Native Seeds/SEARCH

526 N. 4th Ave

Tucson, AZ 85705

1 lb Mesquite Flour @ $13.00

www.nativeseeds.org

October 2, 2006

Peanut Butter Sauce Pan Cookies - Gluten Free

One of my family's favorite recipes is gluten-free, Peanut Butter Sauce Pan Cookies. My baking record is three batches in a row of these cookies when we've had family over.

I've done a little tweaking to the recipe which my mother received from her friend Deannie about 45 years ago, so the flavor is a richer chocolate rather than like cocoa.

Recipe

1 stick butter
2 cups cane sugar
1 1/2 squares semi-sweet chocolate
1/2 cup milk or half 'n half
2 tsp vanilla
1/2 cup + 2 Tb crunchy peanut butter
3 1/2 cups quick rolled oats

Get all of your ingredients together and measured out before starting. Once the chocolate mixture is boiled it will set up before you have time to measure everything out.

Place butter, sugar, chocolate and milk in a large sauce pan. Stirring constantly, bring to a boil. Boil for 1 minute. Remove from heat and add in vanilla, peanut butter and oats. Blend well. Drop by spoonfuls onto parchment paper. Allow 15 minutes for cookies to harden enough to eat.

All of my family loves these cookies. They are a family favorite that disappear quickly.

Source for Gluten Free Oats

The latest Living Without Magazine mentioned a Montana based company called Gifts of Nature which is now carrying certified gluten free oats. They also carry Montina flour and lima bean flour. You can find out more from their website, http://www.giftsofnature.net

September 17, 2006

Chocolate Chip Cookies Gluten Free - Version #3

The gluten-free chocolate chip cookie is a required staple at our house. I've made this recipe more than any other. Since it is one of my children's favorite cookies, it does require continuous baking trials to tweak the recipe to get a finer taste.

I think this version will become the staple at out house. They were perfect. Beautiful on the baking sheet and scrumptious to eat.

Here's what I did:

Recipe - Version #3

2 sticks organic butter
3/4 cup packed brown sugar
3/4 cup granulated cane sugar
1 tsp vanilla extract
2 eggs
1 tsp baking soda
1 tsp salt
1 1/4 tsp kuzu powder dissolved in 1 Tb water
1/3 cup Montina flour
1/2 + 1 Tb sweet rice flour
1 cup oat flour
1/2 cup brown rice flour
2 cups chocolate morsels
Optional: 1 cup chopped nuts

Beat the butter until creamy, then add the brown and granulated sugar. Add vanilla flavoring. Add one beaten egg at a time. Add the dissolved kuzu. Slowly add flours, soda and salt. Once blended add chocolate morsels. Place cookie dough into the refrigerator to chill down.

Preheat oven to 350 degrees. Place spoonfuls of chilled cookie dough on a parchment paper lined baking sheet and bake for approximately 12 minutes or golden brown. Allow to cool before removing the cookies from the baking sheet.

This variation was an instant hit. I made them on Wednesday and by Friday they were gone. This version got four yes votes. I think given the speed that the cookies disappeared...it's a keeper.

What makes this the best version yet? This version lacks xanthan gum. The kuzu powder adds just that bit of cohesion and improved texture that the cookies needed. Using more oat flour than brown rice flour helped to keep the cookie texture smoother and less grainy. Plus, the cookies didn't have the lingering after taste of rice flour. The taste isn't that bothersome unlike the xanthan gum. However I've been trying to achieve that pure rich lingering taste that you got when you had a wheat chocolate chip cookie....rich and chocolatey. I think this version comes the closest so far.